Setting the language for your XenForo 2 forum helps you create a better experience for your users, especially when your forum targets users from many different countries. XenForo supports multiple languages and you can easily add, change, and customize language packs. In this tutorial, we will show you how to install and manage languages on XenForo 2.

1. Download the Language Pack
First, you need to download the appropriate language pack from the language pack source for XenForo. There are many websites that offer free and paid language packs for XenForo. Some popular sources include:
- XenForo Community – Official language packs from the XenForo community.
- XenForo VN – Vietnamese language pack for XenForo.
Once downloaded, you will receive an XML file containing language information.
2. Install Language Packs
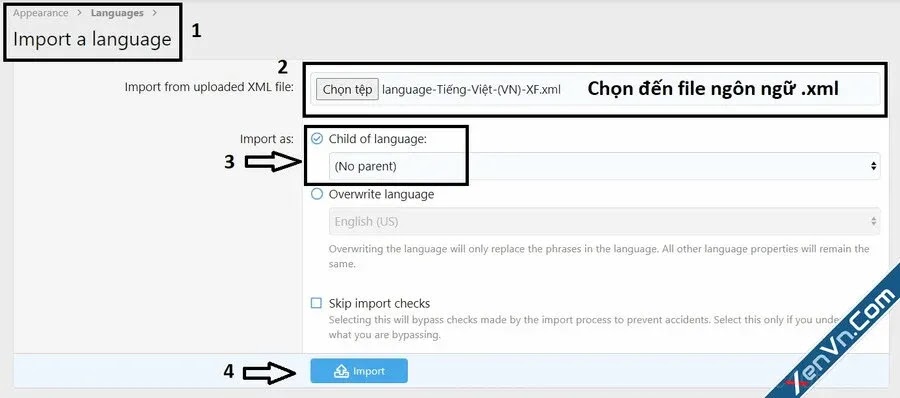
After downloading the language pack, you need to perform the following steps to install it on the XenForo 2 forum:
- Log in to the XenForo admin console.
- Go to Appearance > Languages.
- Click the button Import in the upper right corner.
- In section Import from XML fileselect the language file you just downloaded.
- Click Import to start the installation process.
Once the installation is complete, you will see the new language appear in the list of installed languages.
3. Set Default Language
After successfully installing the language pack, you can set it as the default language for the forum. To do this:
- Go to Appearance > Languages.
- Find the language you just installed and click the dot icon to set it as the default language.
Once the new language is set as default, all users who have not selected a custom language will see the forum displayed in this language.
4. Allow Users to Choose Language
XenForo allows users to choose the language they want to use. To enable this feature, you need to ensure that your forum has multiple languages installed. Users can choose their own language through their personal account settings:
- User logs in to their account.
- Go to item Account > Preferences.
- In section Languageselect the language they want to use.
- Press Save to save changes.
This feature helps users feel more comfortable when participating in forums, especially when your forum has users from many different countries.
5. Edit Language Packs
If you want to customize the content of a language pack (e.g. change the way words are displayed, specific translations), you can edit directly in XenForo. To edit language packs:
- Go to Appearance > Languages.
- Click the language you want to edit.
- In section Phrasessearch for the keyword or phrase you want to edit.
- Make edits and press Save to save changes.
This allows you to customize the forum’s language the way you want, creating an experience that’s unique and relevant to your community.
6. Update Language Packs
When XenForo releases updates, language packs may no longer be fully compatible with the new version. You need to regularly check and update language packs to ensure that they work smoothly. To update the language pack:
- Go to your language pack source and download the latest version.
- Repeat the process Import same as the initial installation, but this time select the option Overwrite to replace the old version.
Language settings
Installing and managing languages on XenForo 2 not only makes your forum more accessible to global users, but also creates a friendly and multilingual environment. Using the steps above, you can easily add and customize language packs to your XenForo.
Hopefully this guide will help you successfully install and manage languages for the XenForo 2 forum. If you encounter any problems along the way, please refer to the XenForo documentation or search Seek support from the community.

